Monitoring and Blocking Based on Office Document Metadata
Starting with version 5.5, Staffcop Enterprise enables its agent to extract file metadata during scans and send it to the server as part of the File event dimension.
Metadata provides details about a file’s properties without exposing its content. The Category metadata field can be used as a tool to tag files. This makes it easier to identify and manage files on user workstations. For instance, you can add the tag Confidential to this field and then set up policies to block files with this tag in their metadata.
Note
Metadata file blocking is an optional feature. While not required for blocking file operations, it helps you block files more precisely and manage file access better.
Enabling Metadata Collection
To start collecting metadata, first, activate File Scanner. Once scanning is enabled, the agent will begin sending an event of type File, which includes the Metadata field.
Metadata collection is only available for documents of following formats:
Extension |
Format |
Microsoft Office Word |
.docx |
Microsoft Office Excel |
.xlsx |
Microsoft Office PowerPoint |
.pptx |
OpenOffice Text Document |
.odt |
OpenOffice Spreadsheet |
.ods |
OpenOffice Presentation |
.odp |
Metadata may be contained in property fields such as Name, Type, Size, etc. The Category field is especially useful because it allows you to tag files for easier identification and management.
Note
The Category field may vary depending on the application. Microsoft Office already includes this field, while in LibreOffice you should create it manually.
Configuring File Blocking with Metadata
Once you’ve tagged your files with metadata, you can set up rules to block them based on that tag.
Setting a Tag to Metadata
Before configuring blocking, ensure metadata collection is enabled in the **File Scan module.
Depending on the office suite you’re using, follow these steps:
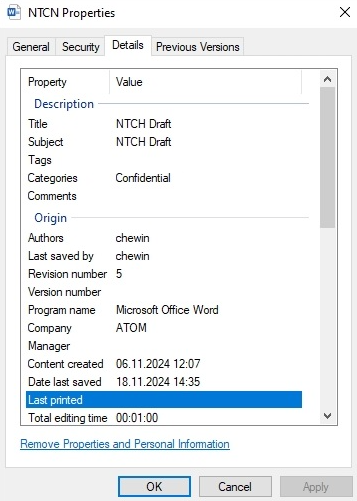
Open the file.
Go to File → Properties → Summary.
In the Category field (Add a category), type a tag name, such as Block.
Save your changes.
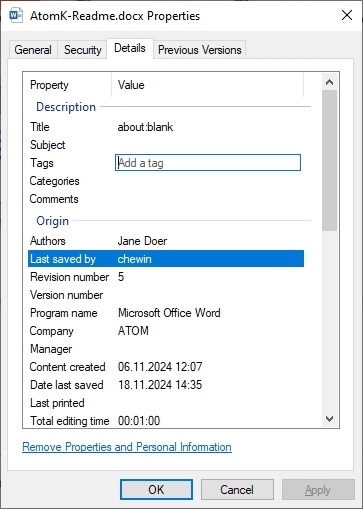
Open the file.
Navigate to File → Properties → Custom Properties.
Click Add Property.
In the Name field, enter “category” in lowercase.
In the Type field, select Text.
In the Value field, type a tag name (e.g., Confidential).

Save your changes.
The blocking is case-insensitive, so CONFIDENTIAL and Confidential are treated as the same value.
To assign multiple values to the Category field, separate them with a semicolon, like this: Confidential; Important.
Add a Blocking Rule in the Configuration
After tagging your files, open the Staffcop web interface and configure a blocking rule.
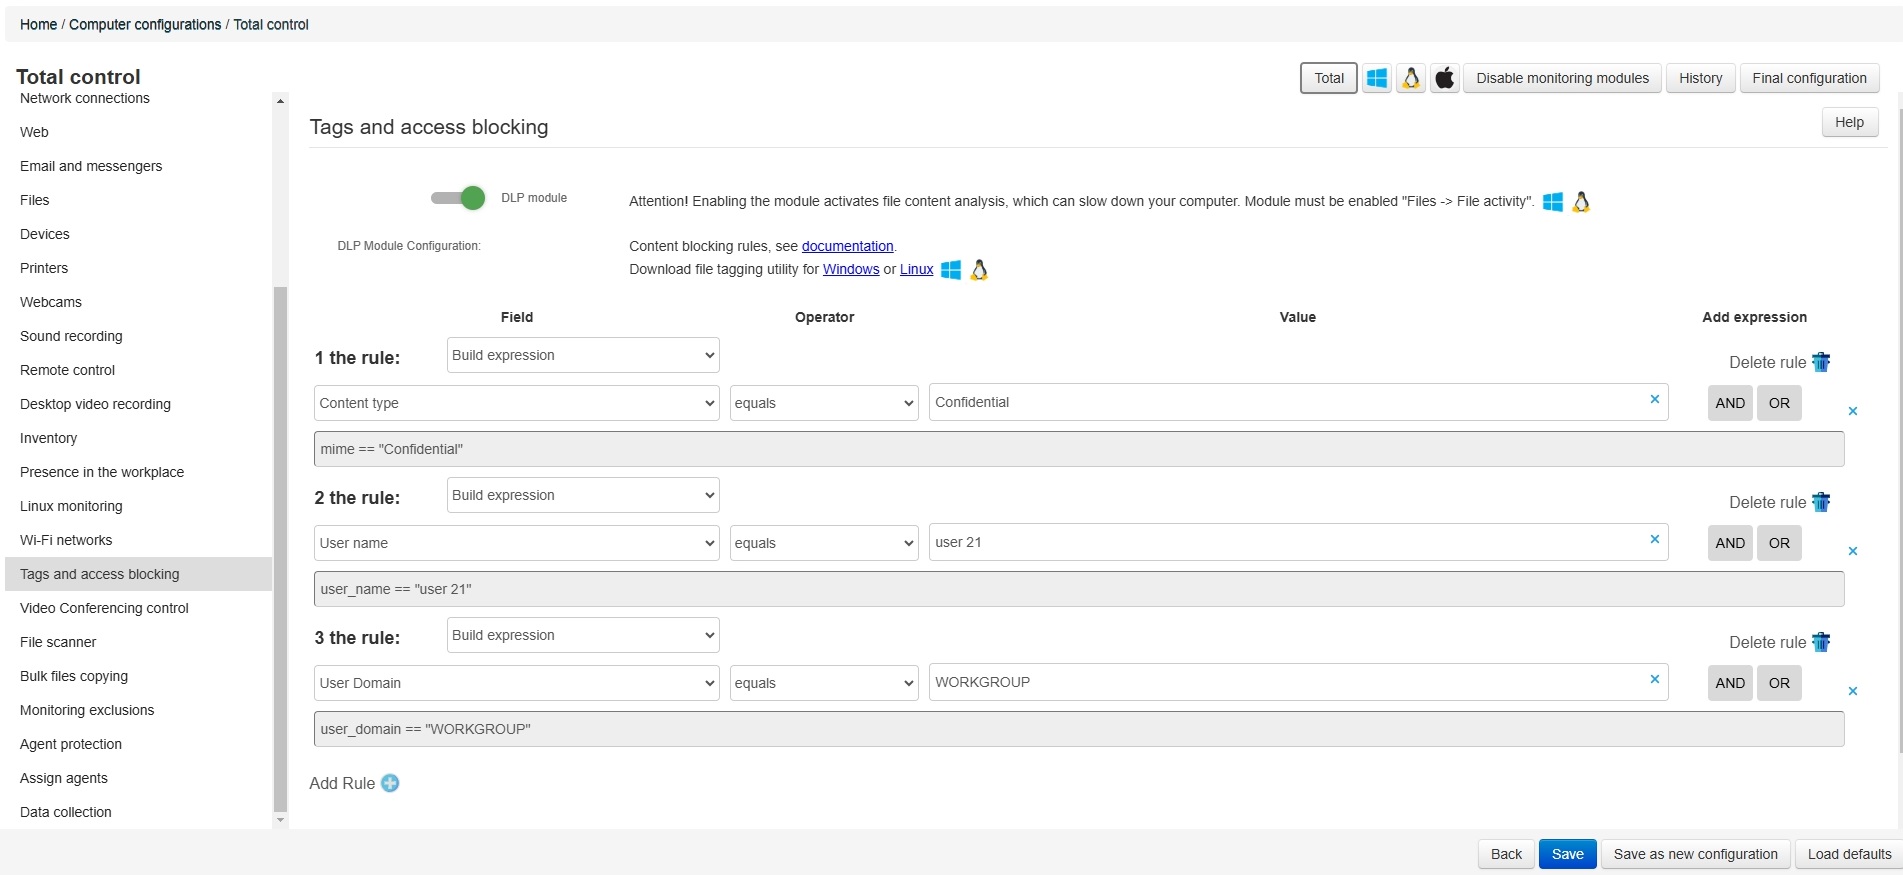
Go to Control Panel → Computer Configurations → your configuration → Tags and Access Blocking.
Enable the DLP module.
Click Add Rule +.
Set the rule as File Category — equals — your tag, in this example Confidential.
If needed, add other rules, such as blocking for a specific user or domain.
Save your changes.
Once saved, users will see the message “Unable to access the file” when trying to open a blocked file.
Blocking Rules for Multiple Tags
If you’ve added multiple tags to the Category field, you can use regular expressions to block files based on those tags.
Case 1: Blocking Files Containing Both Confidential and Important Tags
Metadata contains two tags: Confidential;Important.
When you have multiple tags like Confidential and Important, you can block files based on these tags using the Matches operator in your rule.
(^|;)confidential($|;)|(^|;)important($|;)

It searches for these tags, whether they appear alone or together, and blocks any file that matches this pattern.
Case 2: Blocking Files Containing Both Confidential and Important Tags by Confidential Tag
Metadata contains two tags: Confidential;Important.
If you want to block only files with the Confidential tag (ignoring the others):
You use the same Matches operator, but the regular expression will match only files containing the Confidential tag in the metadata.
(^|;)confidential($|;)

Case 3: Blocking Files Containing Either Confidential or Important Tag
If you want to block files that contain either Confidential or Important, you can use the In operator with the value confidential important.
This will block files that have Confidential or Important in their metadata, without using regex.
confidential important

Managing Metadata
On the Staffcop dashboard, you can view and filter files based on the Metadata dimension.
Viewing Metadata in Staffcop
File metadata provides key information that can help track access, changes, and movement of important documents.
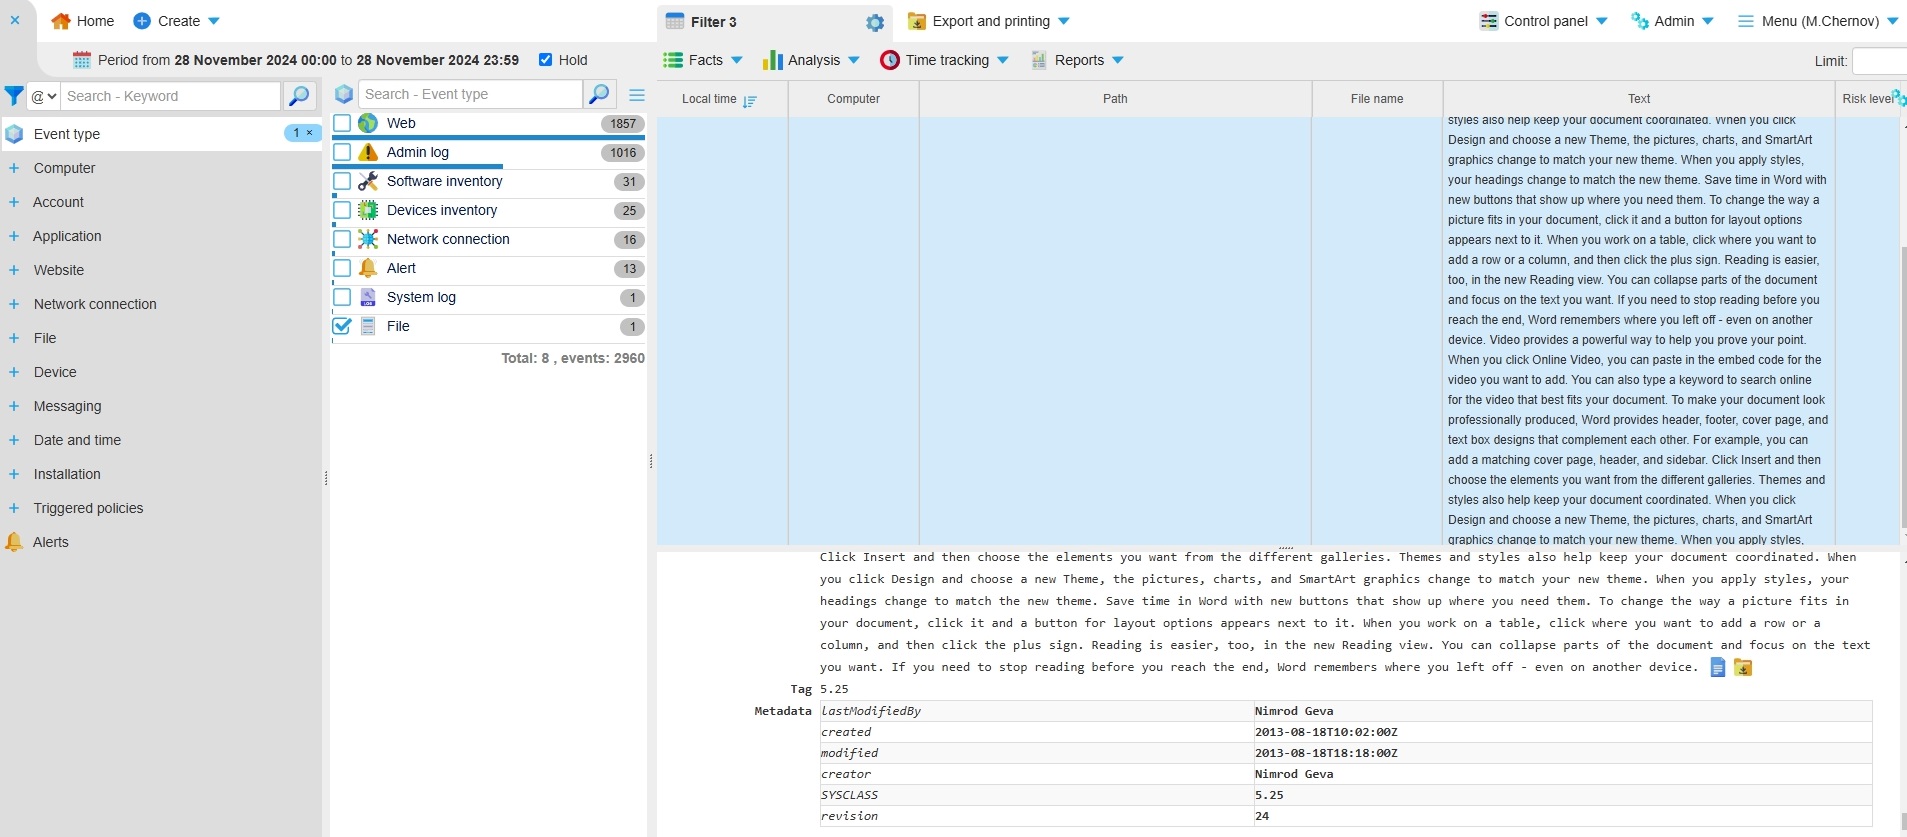
To view metadata, go to the Constructor and select File as the event type.
You can also add other dimensions, such as computer, user, or file extension, if needed.
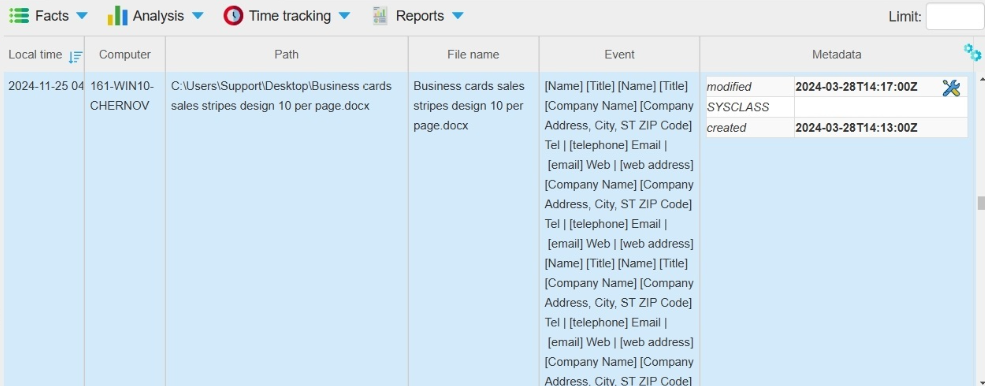
Search for the file in the Lens to view filtered events. The file’s metadata will be displayed in the Metadata column.
To view metadata more easily, add the Metadata column to the event table:
Click on the gear icon and select New Setting.
In the Available Fields → File section, click Metadata. The line will move to the Selected fields.
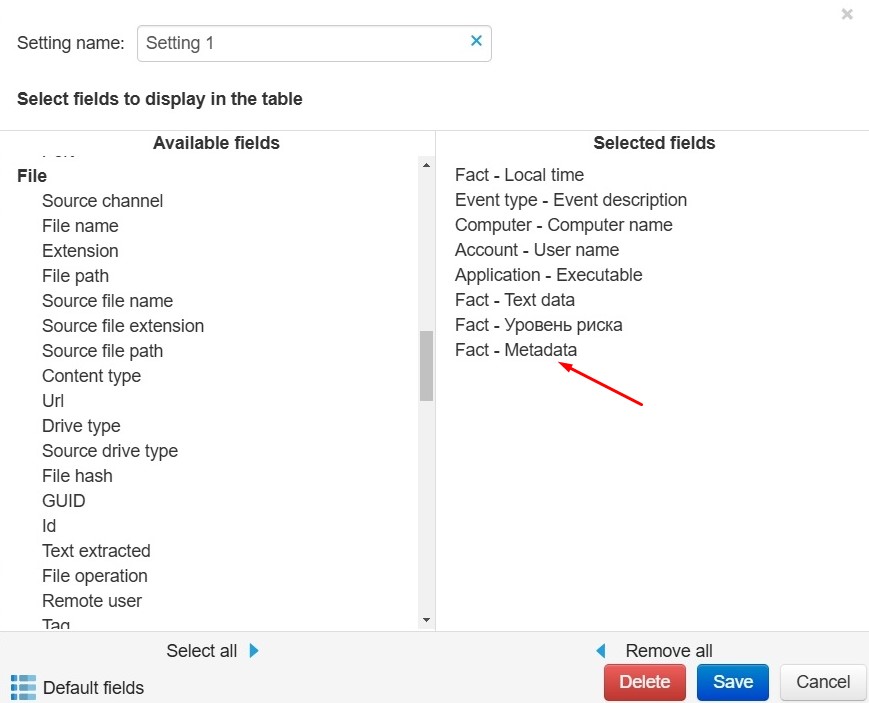
Save your setting. The Metadata column will now appear in the event table.
Filtering Files by Metadata
Metadata filtering helps you find files with specific characteristics. You can use both standard filters in the Constructor tab or the more flexible Complex Filter for precise results.
Constructor offers basic filters that you can use to search for files based on simple dimensions. For instance, you can filter files by metadata tag like Confidential and a user name.
Complex Filter allows you to apply multiple conditions at once. Unlike standard filters, it supports logical operators, enabling you to combine multiple conditions in a single search.
Note
Since metadata contains a lot of data, standard filters might not be enough. Use the Complex Filter for better precision.
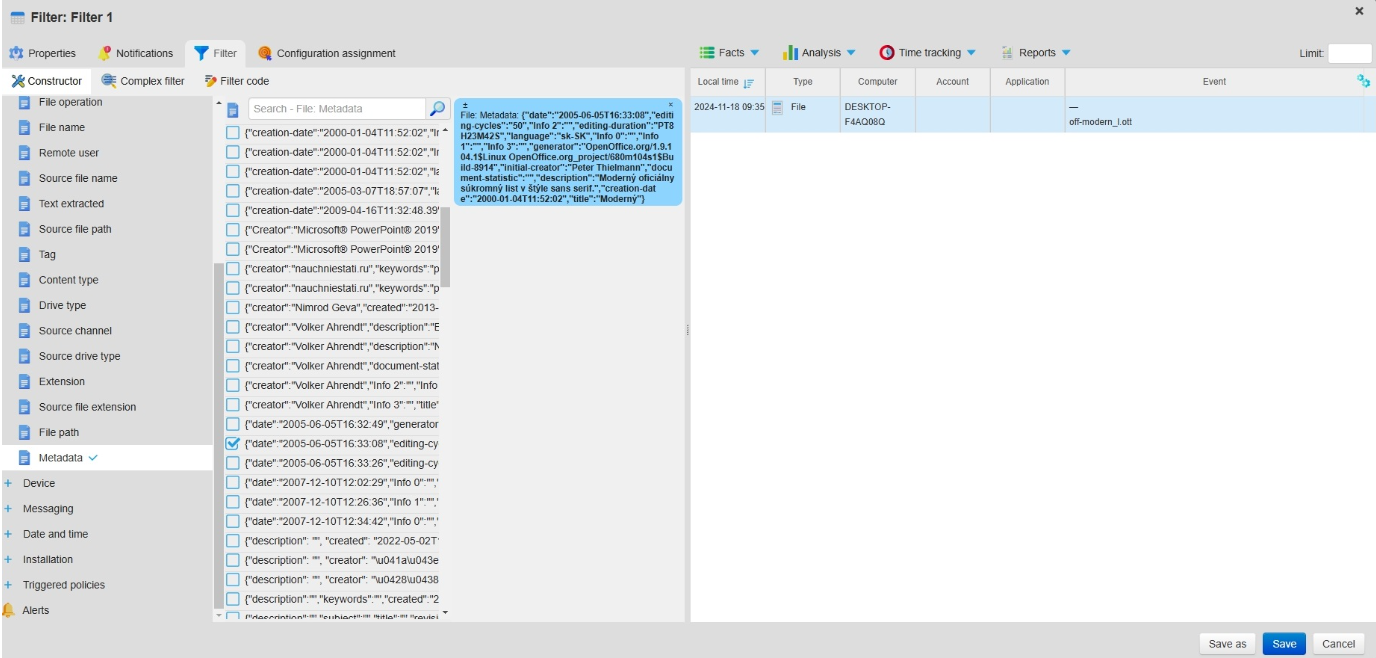
Open an existing filter or create a new one.

Go to Filter → Constructor.
Select File in the left sidebar.
Click Metadata.
Add any other necessary dimensions.
Save the filter.
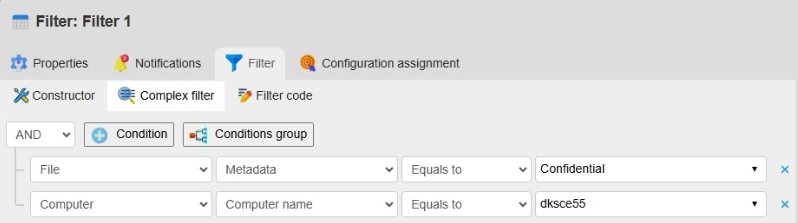
Open an existing filter or create a new one.
Go to Filter → Complex filter.
Click +Condition.
Set the values as File — Metadata – equals to — your tag, such as Confidential.
Add other conditions, if needed.
Save the filter.