Working with File Scanner (New Version)
The File Scanner (new version) is a Staffcop Enterprise component for identifying and protecting documents on the corporate network.
It scans both open and closed files on employee computers and allows you to tag and control access to important documents.
Note
Starting with Staffcop Enterprise version 5.7.1, a license is required to access the scanner. The built-in scanner is no longer available.
This component is compatible with Windows agents version 5.8.2604 and higher.
Attention
The File Scanner only works on a single instance of Staffcop Enterprise. Cluster support is not available.
New Features
The file scanner offers an improved interface, permissions management, and tools for precise file searching.
Advantages:
High performance – stable scanning even at large file volumes
Flexible permissions system – different access levels for different users
File categorization – efficient file filtering
Automatic scanning – 24/7 monitoring
Centralized viewing – access to file information in the scanner interface
System Requirements
Before using the file scanner, please check the system requirements.
Working with the File Scanner
Preparation: Purchase a license, activate the scanner, and enable File Activity in the computer configurations.
Access Settings: Define which administrators can use the module.
Category Settings: Create scanning categories from scratch or from a template.
File Scanning: Start scanning files on selected computers.
Tags Settings: If necessary, tag target files.
Note
During scanning, the server finds files with any extensions.
However, tags can only be applied to files with the following extensions: docx, doc, xlsx, xls, pptx, ppt, odt, ods, odp.
Access Control: Use tags to configure additional protection measures. For example, you can block files tagged as Confidential from being copied to a USB drive.
See also
This approach allows you to control the use of corporate documents and prevent their unauthorized distribution.
Scanner Activation
Three installation scenarios are available for the File Scanner:
Scenario |
Service Distribution |
|---|---|
2 Servers |
|
3 Servers |
|
Local Installation |
all services are installed on the main Staffcop server |
Attention
Local Installation is not recommended. If you need to install the File Scanner locally, please contact technical support.
Installation instructions:
Enabling File Activity
Ensure that the File Activity parameter is enabled.
Go to Administration → Computer Configurations → your configuration.
Select Files.
Find the File Activity option and enable it.
Access Settings
The File Scanner incorporates an access control system. Each administrator receives only the necessary access.
To assign rights, go to Administration → Administrators → Groups.
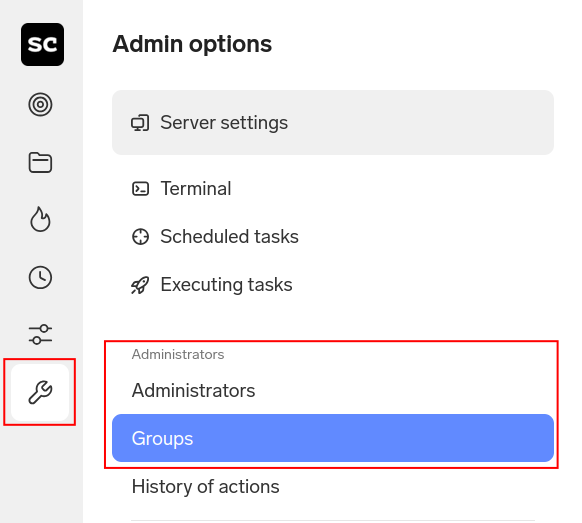
Predefined Roles
The Groups section provides four standard roles with pre-configured sets of permissions:
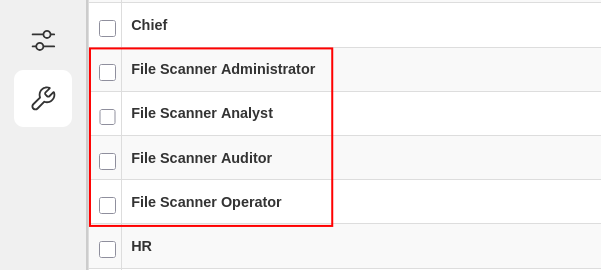
Auditor — view-only access for control and verification. Cannot access anything else.
Analyst — can view and manage categories for data organization. Does not perform scanning or tagging operations.
Operator — operational access for launching scans and managing tags. Does not work with categories.
Administrator — full access for configuring and managing the module.
Role Comparison:
Access/Role |
Auditor |
Analyst |
Operator |
Administrator |
|---|---|---|---|---|
View Files |
✓ |
✓ |
✓ |
✓ |
Launch Scanning |
— |
— |
✓ |
✓ |
Work with Categories |
— |
✓ |
— |
✓ |
Tagging |
— |
— |
✓ |
✓ |
Each permission defines what actions are available to the user in the File Scanner module. If a permission is not granted, the corresponding interface elements are not displayed.
Permission |
Description |
|---|---|
Section Access |
Basic permission to access the scanner |
Category Management |
Assign categories to files, creating categories |
View Files |
View files, work with filters and templates |
Launch Scanning |
Launch, stop, and configure scanning |
Tagging |
Add and remove tags on supported files. |
Note
Without the Section Access permission, all other permissions are unavailable.
Assigning Roles
To assign a role to a user or create a new role, see the Administrators guide.
You can create a new role and add permissions to it.
Go to Administration → Groups.
Click the Add button at the bottom of the page.
Select the Access to the section “File Scanner” permission and use the arrows to move it from Available Permissions to Chosen Permissions.
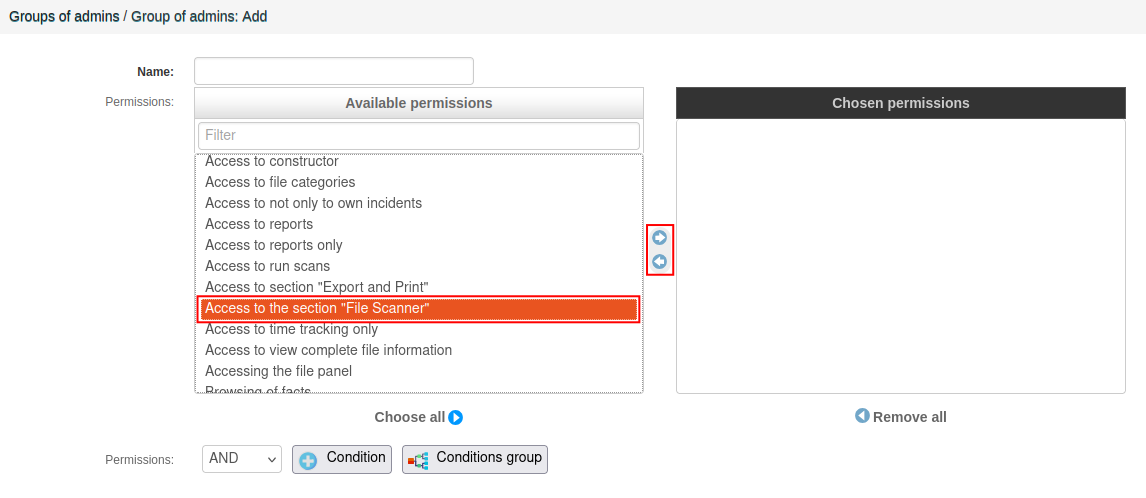
Add any remaining permissions.
Select Save.
Interface Overview
Note
The File Scanner is available only in the new interface.
To open the scanner, select File Scanner in the side menu. The file scanner page will open.
Initially, the file list is empty — files will appear after the first scan. The number of found files is displayed next to the header and updates based on current filter settings.
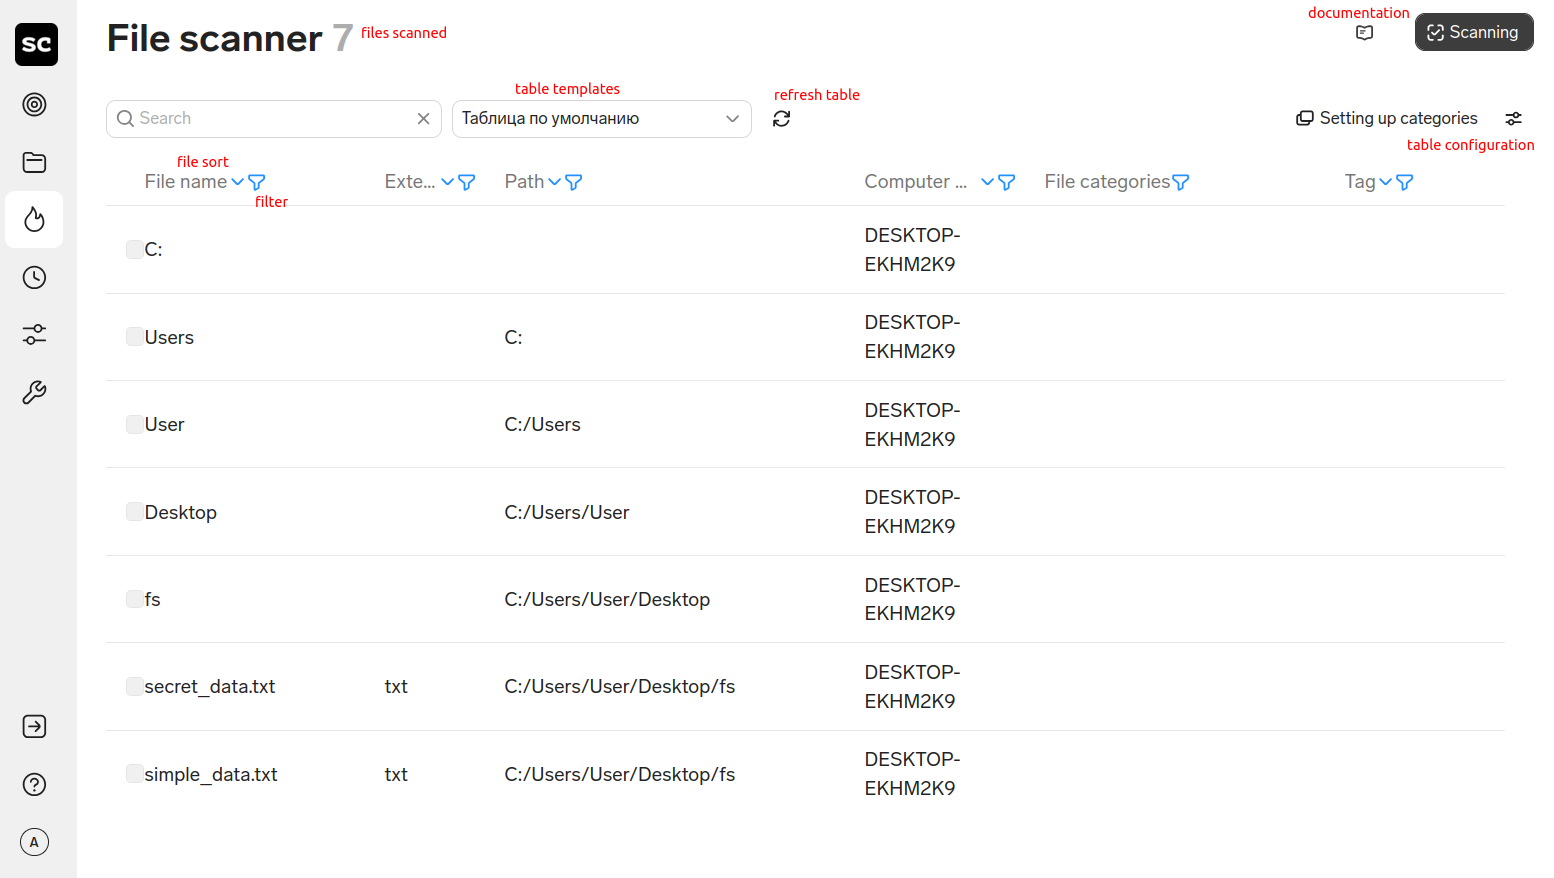
The main work interface consists of four zones:
Control Panel — from here you can:
Launch scan
Configure categories
Update data
Open documentation
Open table settings templates
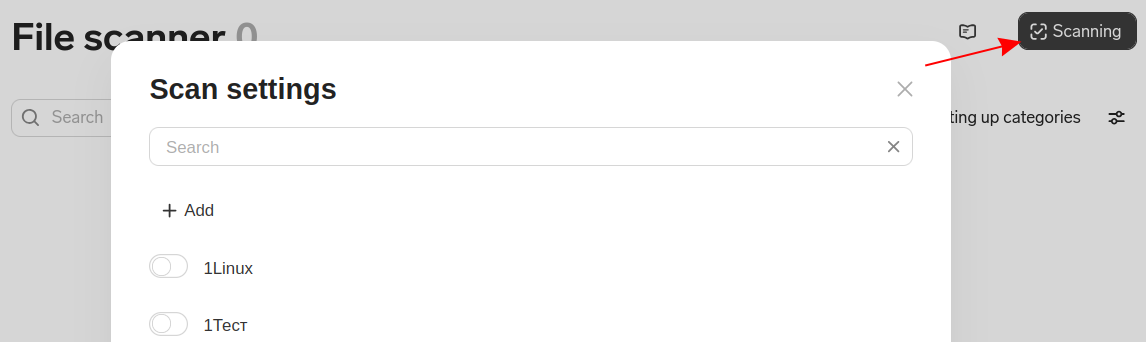
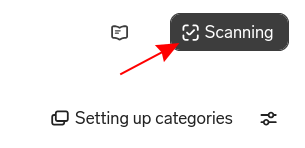
To access scan settings, click Scanning.
If the user does not have permission for any individual actions, the corresponding buttons will be hidden.
Filters — allows you to quickly narrow the list of found files by name, extension, tags, and other attributes. Multiple filters can be selected.
List of Found Files — a table displaying scan results. Click any row to open a File Card, which shows detailed information about the file and its content.
Attention
Before scanning, we recommend configuring file categories.
The following section describes file categories and their configuration.
File Categories
Access Level: Analyst, Administrator.
File Categories are a tool for classifying documents according to specified parameters. They work like security policies: they determine which files are considered sensitive and what protection measures apply to them. A file is assigned to a category if it matches at least one of the specified conditions.
Note
Categories are assigned to files during scanning. Changing category settings will not affect already processed files. To apply new file categories, perform a new scan.
Files can be assigned to categories using complete or partial category conditions:
File extensions
Keywords
Regular expressions
Morphological forms
File Extensions — used when a specific file type is important: drawings, codes, certificates, office documents.
Examples: docx, xls, cdw, key, pem, py.
Keywords — this category will trigger if the specified words or phrases are found in the document.
Examples: COMMERCIAL SECRET, access restricted, Approved.
Regular Expressions — used for complex patterns such as document numbers, email addresses, technical records, configs, logs.
Examples:
Emails: [a-zA-Z0-9._%+-]+@[a-zA-Z0-9.-]+.[a-zA-Z]{2,};
Log files: access[s_-]?log;
IT Data: cert|CERT|encrypt|ENCRYPT.
Morphological Forms — this category will trigger if a selected word is found in the file in any of its forms.
Example: you specified the word contract, the scanner will find contracts, contract’s, contracting, etc.
To work with categories, select Setting up categories. Templates and Custom categories will be displayed.
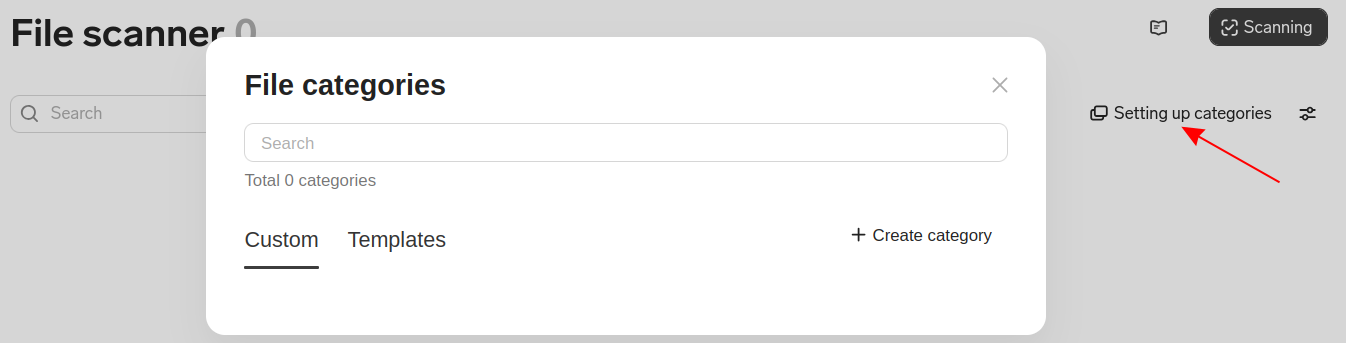
Only templates are available on first launch. These can be used as a starting point for creating your own custom categories.
Templates
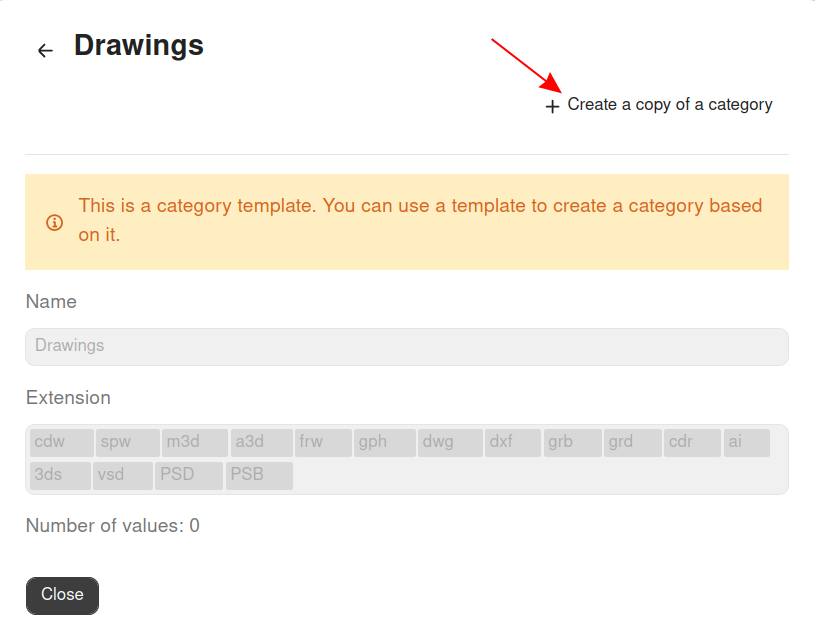
Templates are pre-installed category conditions. You can create your own categories based on them, but the template itself cannot be changed or deleted. Templates open for viewing only.

Template Description:
Template |
Includes |
Example Criteria |
|---|---|---|
Drawings |
Project documentation and engineering diagrams |
Extensions: |
Critical documents |
Documents with signs of confidentiality |
Keywords: |
IT-data |
Technical files: |
Extensions: |
Financial information |
Financial documents |
Keywords: |
Internal documents |
Organizational and official documents |
Keywords: |
Accounting |
Accounting and reporting documents |
Keywords: |
Personal data |
Documents with personal information |
Regular Expressions: |
Custom Categories
Custom categories — categories created by the user, can be based on templates.
Unlike templates, you can do anything to these categories:
Enable and disable the category
Edit all category fields
Delete the category
Create copies via Save As
Note
By default, only templates are configured in the system. Create a category to apply it to files.
Create Category from Template
Go to Setting up categories and open the template.
Select +Create a copy of a category.
In the Name field, enter the category name.
Enable the active state if you want to make the category active immediately.

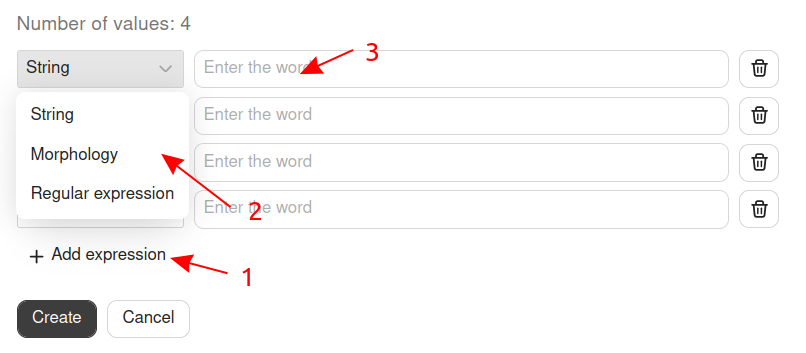
Select the Extension field to add a new extension.
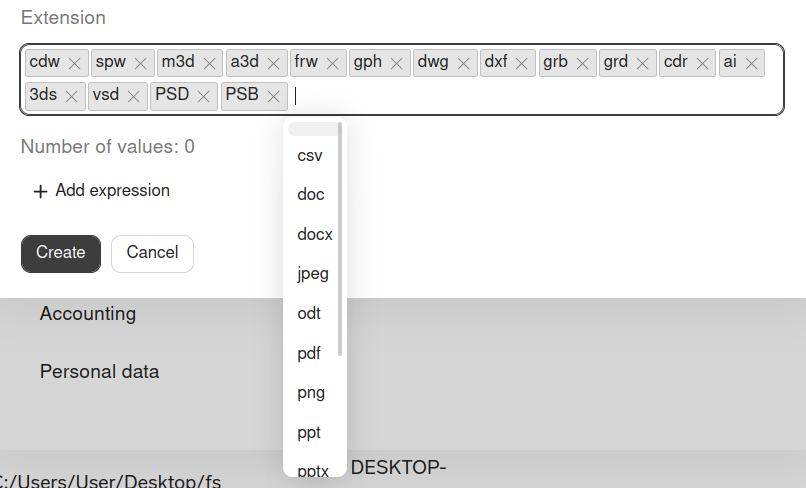
Select Add expression to add keywords.
Save all changes.
New Category
The second method is to create a wholly new category.
Go to Setting up categories and select +Create category.

Fill in all necessary fields.
Save all changes.
Once categories are configured, proceed to configuring and launching scanning.
File Scanning
Access Level: Operator, Administrator.
To configure file scanning, select the Scanning button in the main scanner window.
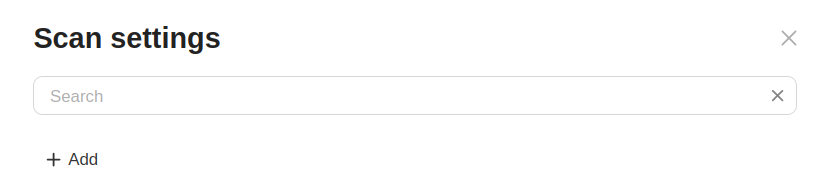
The Scan settings window will open. On first launch, the list of scanning configurations (settings) will be empty.
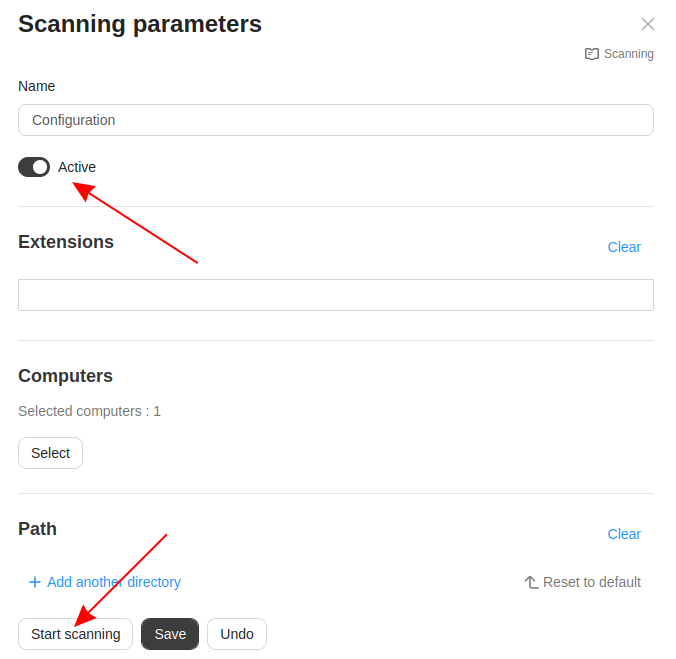
Scanning Parameters
Scanning parameters define the rules and conditions for checking files in the system.
There are no ready-made configurations in the scanner, so create a configuration manually before scanning.
To create a configuration, in Scanning parameters select the + Add button and fill in the fields, for example:
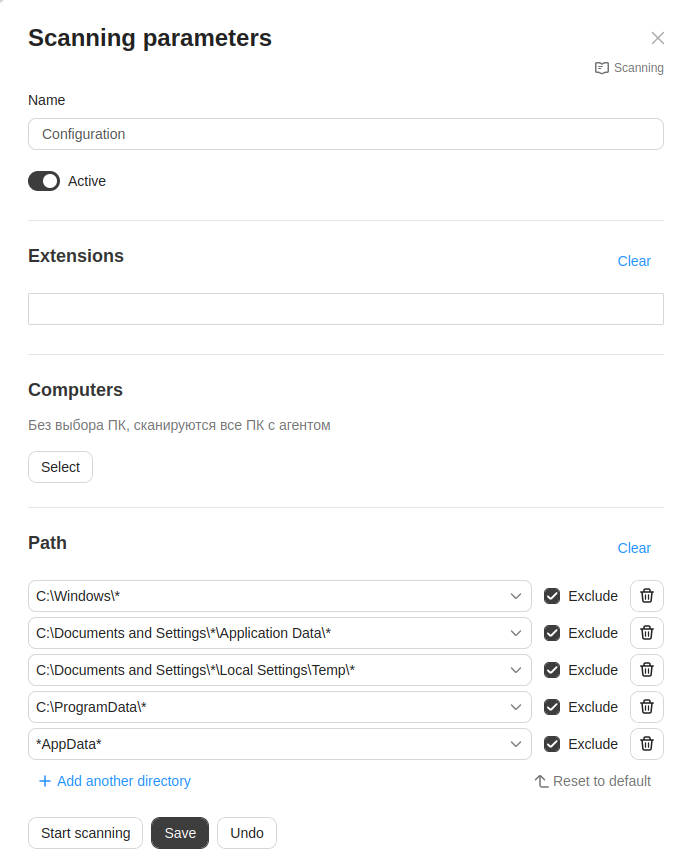
Name — enter a unique configuration name.
Extension — select file formats from the list.
Computers — select computers for scanning.
Note
If no computer is selected, the scanner will scan files on all computers. With a large number of workstations, scanning may take a long time.
Path — this section displays system folders excluded from scanning by default. You can add any folder to the exclusions, if necessary.
Danger
Do not remove system folders from exclusions list. The preset paths contain system directories that do not require scanning. Their removal may lead to excessive system load.
For effective monitoring, we recommend configuring folder-specific scanning rather than full system scans.
In addition, you can:
Add paths — select + Add another directory
Return to default settings — select Reset to default.
Active — turn on this option to enable the configuration. Automatic scanning will now be performed based on the selected configuration.
Save — select to apply changes. After saving, the system will return to the list of configurations.
Note
If another administrator has simultaneously modified the current configuration or launched a scan using it, the system will offer you to rename and save it as a new configuration.
Scanning Modes
The File Scanner provides two scanning modes:
Automatic scanning — scans files only during file operations (creation, modification, moving, copying)
Use automatic scanning when you need up-to-date information about critically important files; the system will update scanning results according to the configuration when files change or new files appear.
Manual scanning — scanning of static files in the system at the time of scan launch
Use manual scanning for initial list formation and searching for files requiring protection.
Launch Scanning
Attention
Only one manual scanning can be launched at a time. If another administrator has started scanning, wait for its completion before launching a new one. Multiple automatic scans can be launched.
To launch scanning:
In Scanning parameters, open or create a scanning configuration.
Select the scanning mode:
For automatic scanning — set the option to Active.
For manual scanning — click the Start scanning button; the Active option must be disabled, otherwise the system will offer to save a copy of the configuration and use it for manual scanning.
After launching, the server will start scanning. During automatic scanning, computers outside the network will be queued. The scanner will scan them as they appear on the network. Scanning may take some time.
Scanning Status
Access Level: Operator, Administrator.
Once a scan is launched, a status button becomes available, allowing you to monitor progress in real time.
Click the button to open the status window, which displays real-time information:
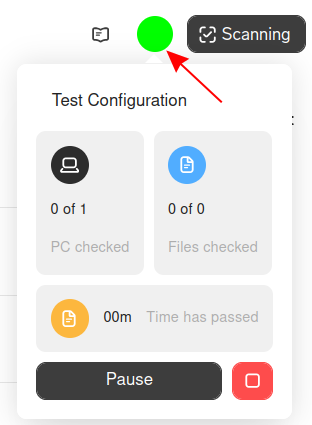
Clickable name of the active scanning configuration
Number of computers scanned
Number of files scanned
Time since scan started
Pause button — suspends the scan for an unlimited time, and the button changes to Resume Scanning
Stop scanning button — upon stopping, scanning cannot be resumed
Indicators display the operation status:
Green — in progress
Yellow — paused
Note
After the scan is complete, data will continue to arrive to the server for processing, recording, and categorization. This means files will appear in the lists with a delay, even when the scan is complete.
After the scan is complete, the status window will close.
Viewing Scan Results
After the file scan is complete, a table with detected documents will appear on the scanner page. The system saves both new files and files from previous scans. Use page navigation to view previous files.
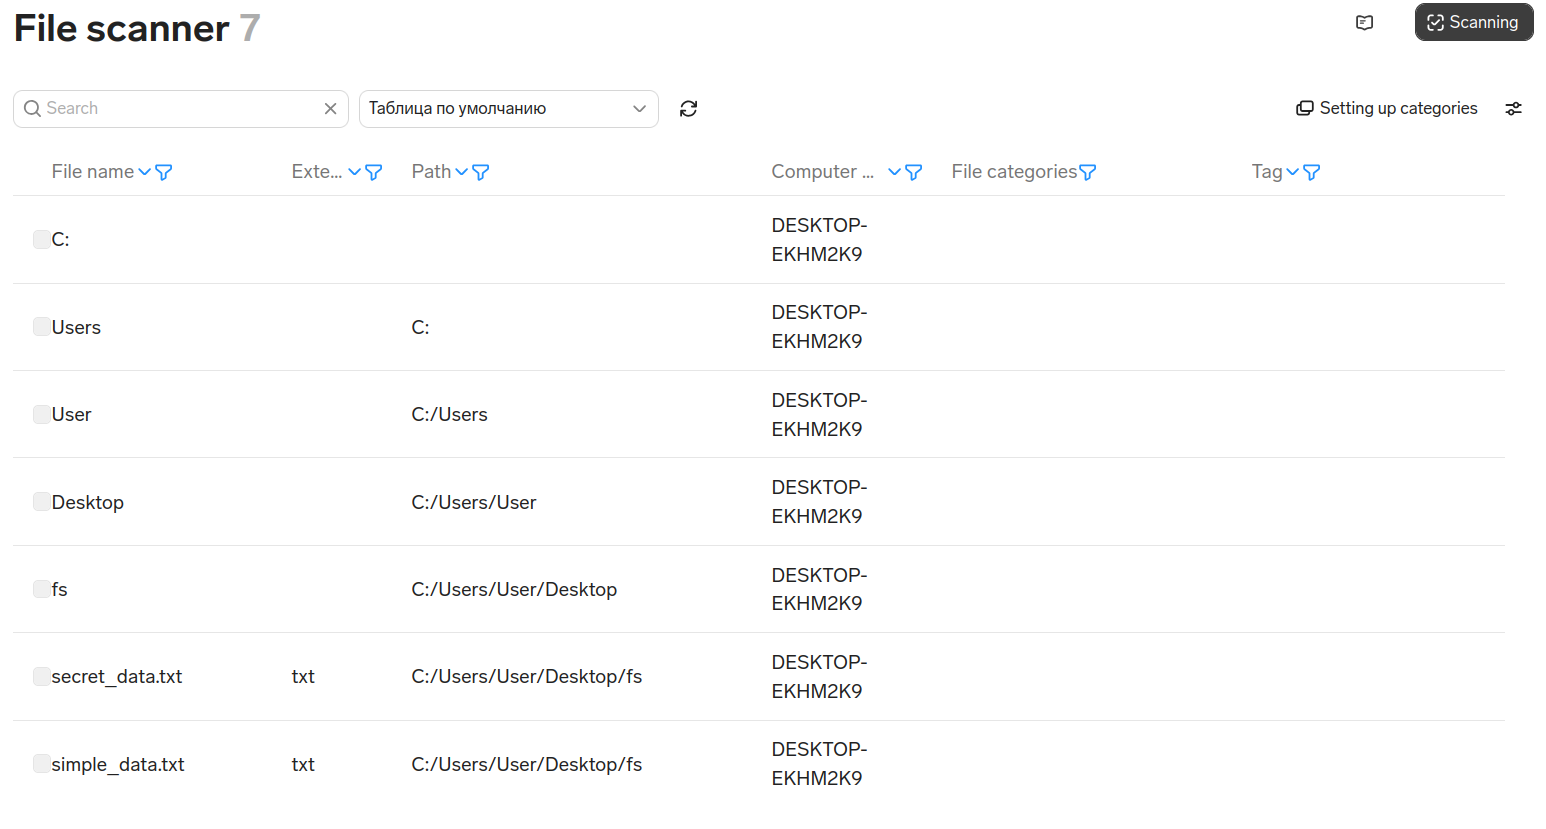
Table Settings
On first launch, all attributes are included in the table: file name, extension, path, and others. You can hide unnecessary columns or change their order in the Table Settings:

The settings contain:
Selected attributes counter
List of all available attributes as checkboxes
Default table button — to restore the default table
Available options:
Action |
Description |
|---|---|
Change column order |
Drag attributes within the Table Settings menu |
Enable/disable attributes |
Check the attribute option |
Apply changes |
Changes take effect after the Table Settings menu is closed |
Table Display Templates
To avoid configuring the table anew every time, you can save table display settings as a template.
The template includes:
Current table sorting
Selected attributes
Column order
To save a template:
Configure the Table Settings accordingly.
Close the settings window, the Save as template button will appear in the control panel.
Select Save as template.

Enter the template name and save the template.
Templates are then accessible in the menu, in the field named after the current template, for example:
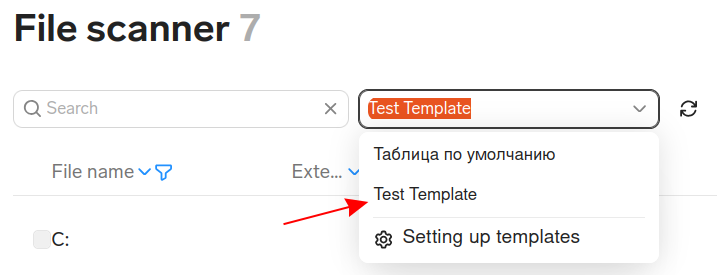
To apply a template:
Select the templates field. A list of all templates will open.
Select a template or type the template name in the field to search for it.
After selecting the template, the table will rebuild automatically.
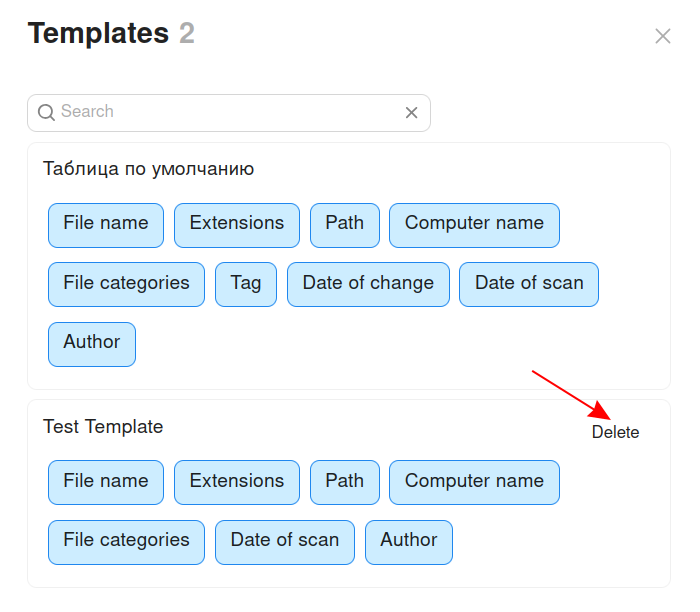
Selecting Setting up templates will open a list of templates with all attributes. If you hover over the template name, the Delete button will appear. Select it to delete the template.
Filters and Sorting
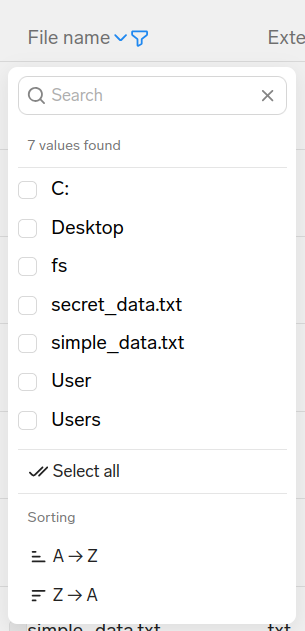
Filters are available for each table column.
To open a filter, select the icon in the header of the desired attribute.

Filters are applied to the file table instantly and can be used both separately and in combination. Found files will match all selected conditions.
Example of a complex query: find all documents with a pdf extension from the Finance category, tagged as Important.
To clear all filters, use the Reset filters button.
File Search
The search bar is located above the table.
Only file names can be searched. To clear a search, select the x button.
Working with Files
Viewing File Card
To open a file, select the corresponding table row. The file card will open:
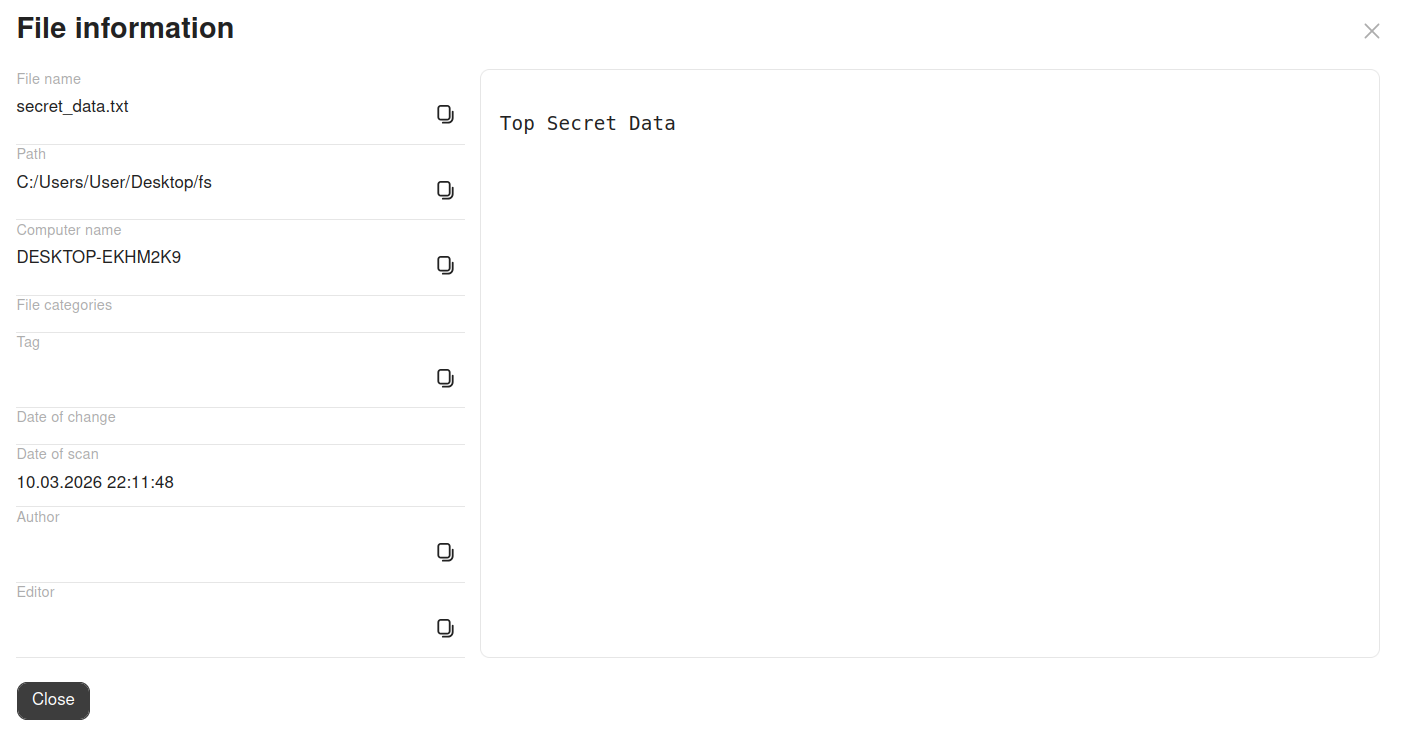
The card contains:
File content
Full path and file name
Modification date
Scanning date
File categories
Tag
Information about the author and editor
Tagging
To set or remove a file tag:
On the file scanner page, select files in the table to be tagged.
Note
Tags can be added to files with the following extensions: .docx, .doc, .xlsx, .xls, .pptx, .ppt, .odt, .ods, .odp.
A tag control panel will appear at the bottom of the page.
Select Set Tag.
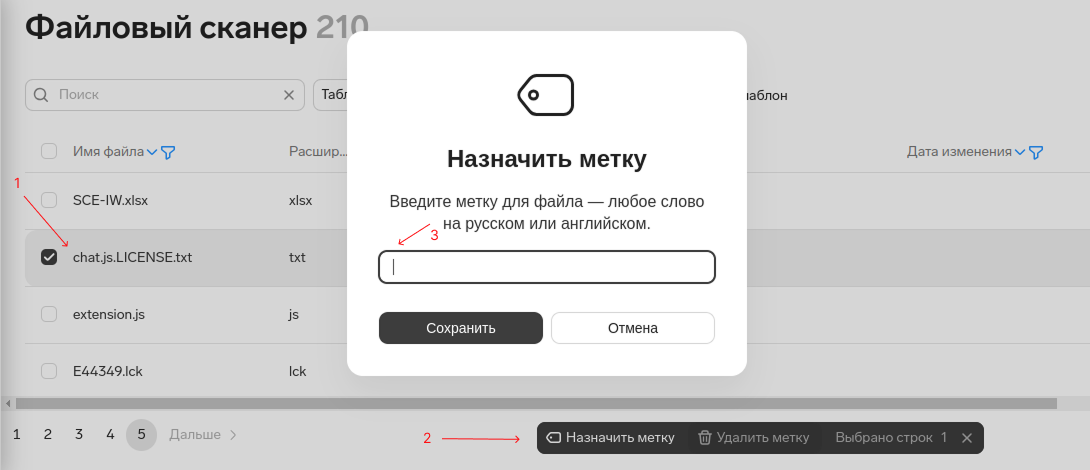
Enter the tag name in the field, for example Confidential.
Select Save.
The server will then start tagging. Files are tagged when the computer appears on the network. To remove a tag, select Remove Tag.
Example of Tag Operation: Blocking File Upload to USB Drive
This example demonstrates how to configure protection so that files with a specific tag are blocked from being copied to a USB drive.
Select the Home button in the top left corner to return to the main interface.
Go to Control Panel → Computer Configurations → your configuration.
Select Tags and access blocking.
Ensure that the DLP Module toggle is enabled.
Select Add Rule+.
Fil in the rule fields: Tag Value — equals — tag name.
Save all changes.

Last Updated: 24.03.26