Content Analytics Policies
Policies that send events to the recognition server. Located in the Policy tab in the Policies → Content analytics folder.
To enable content recognition:
In the Policy tab, go to Policies → Content analytics.
Enable policies for the content you want to monitor.
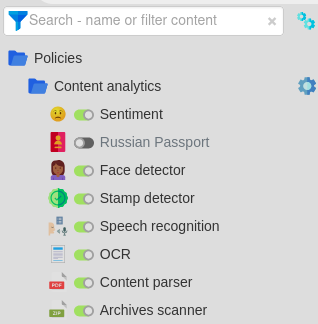
Content analytics includes policies that don’t require the recognition server:
Content parser: extracts text from Intercepted File events
Archives scanner: extracts files from archives from Intercepted File events
OCR
Automatically recognizes text in images.
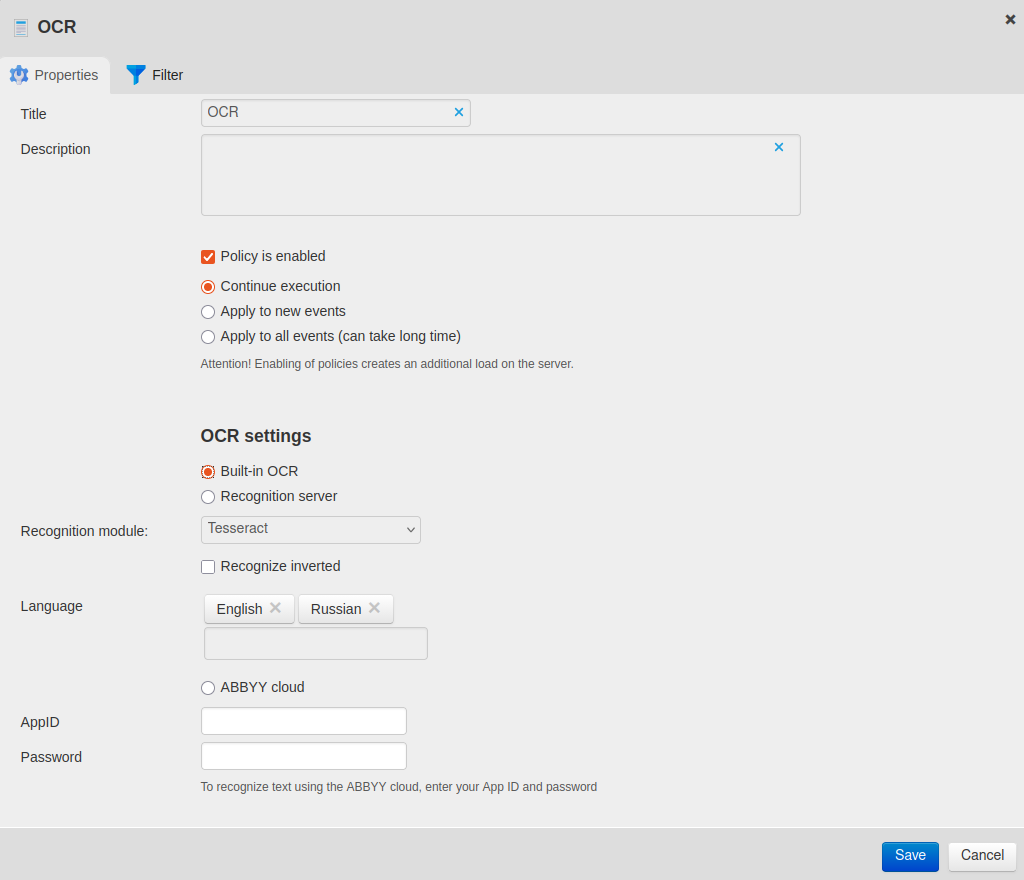
Image Format |
Processing Time, sec. |
Full HD |
5 |
4K |
20 |
Stamp, passport images, JPEG |
4–6 |
Face recognition |
5–60 |
To turn on OCR:
In Policies → Content analytics, open OCR.
In the policy Properties tab, flag the Policy is enabled option.
Select the recognition engine:
Built-in OCR — Staffcop server OCR
See also
Recognition server — separate recognition server
Select the Recognition module:
Tesseract — free library for basic content recognition
- Content AI ABBYY — paid module. Additional server configuration and a paid OCR license are required.
Highly accurate in recognizing inverted images.
Turn on the Recognize inverted option if you need to recognize text in upside-down images. This increases the recognition server load.
Select the Language for text recognition.
In the ABBYY Cloud section, you can connect to an ABBYY cloud account, if you have one:
turn on ABBYY Cloud
enter your AppID and Password
Add any necessary filters in the Filter tab.
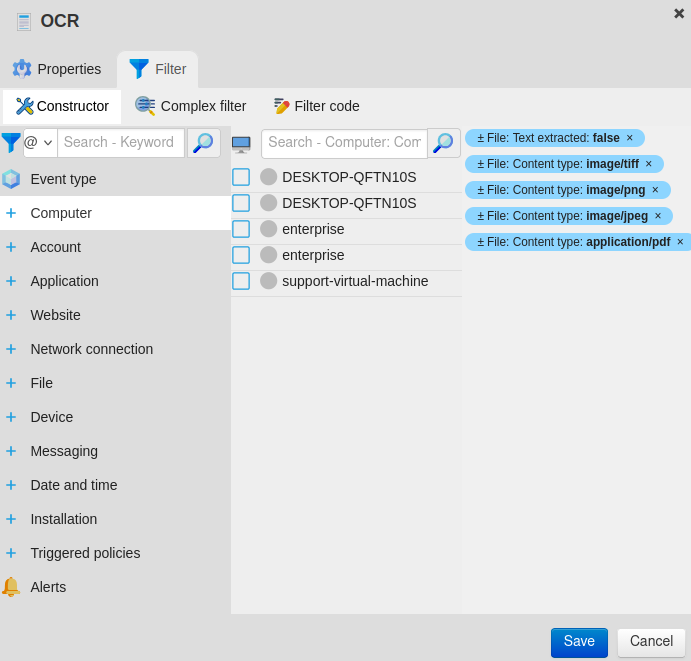
pdf, jpg, png and tiff formats from Intercepted file events are processed by default.
agent_attachedfile@mime:mime=application/pdf
agent_attachedfile@mime:mime=image/jpeg
agent_attachedfile@mime:mime=image/png
agent_attachedfile@mime:mime=image/tiff
agent_attachedfile@extracted:extracted=false
agent_eventtype@default:agent_eventtype=0#Intercepted file

{
  "operator": "AND",
  "rules": []
}
Speech Recognition
Converts audio recordings from Audio Recording events to text.
Recognition is available for .mp3, .mpeg, and .asf files.
Speech recognition can be performed using the recognition server.
Attention
Speech recognition is only available starting with Staffcop version 5.6.5. Upgrade your server if you have installed the recognition server on an earlier version. To upgrade, please contact technical support.
To turn on speech recognition:
In the Policies → Content analytics folder, open Speech recognition.

In the policy Properties tab, flag the Policy is enabled option.
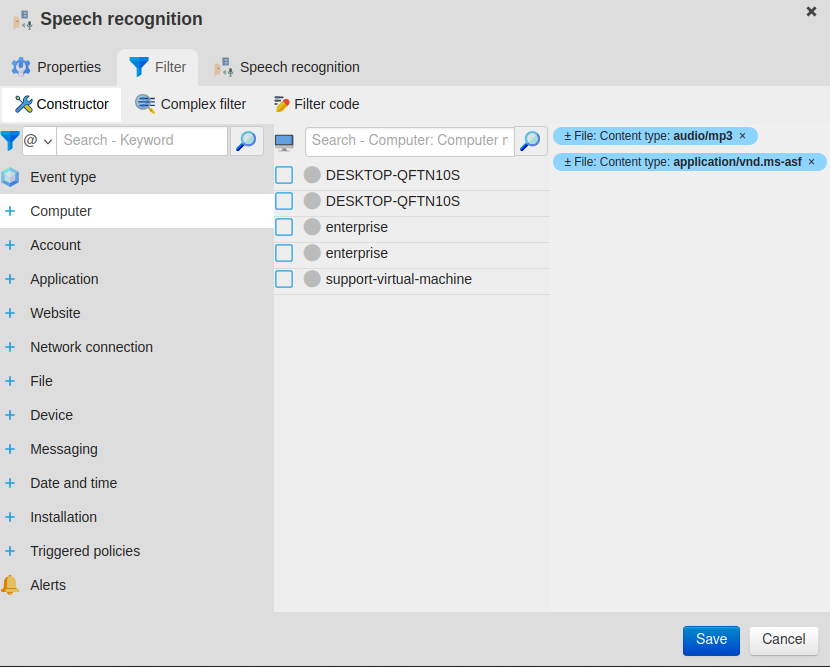
Add any necessary filters in the Filter tab.
Important
Audio Recording has the .asf extension. Make sure that the ± File: Content type: application/vnd.ms-asf filter is active.
Note
Specify computers or users to speed up the recognition process.
Go to the Speech recognition tab and select Engine → Recognition server.

Save all changes.
Now all incoming Audio Recording events will be sent to the recognition server for transcription.
Speech Recognition Accuracy
By default, a fast model is enabled for speech recognition, but the recognition results may not be perfectly accurate.
If necessary, a more accurate, slower model can be used.
To use a more accurate model:
Connect to the recognition server via SSH.
Open the recognition server configuration file in a text editor:
sudo nano /etc/staffcop/cpservice-config
Add the line:
WHISPER_MODEL = 'whisper.cpp/models/ggml-model-whisper-medium-q5_0.bin'
Save all changes.
Restart the service:
service staffcop-cpservice restart
Stamp Detector
The recognition server detects stamps based on jpg, jpe, jpeg, png, and pdf format examples.
Note
Only round seals can be detected.
For this policy to work, stamp examples need to be provided: images containing the stamp.
Surrounding text and signatures do not interfere with recognition.
Stamp sample requirements:
an image size of at least 400x400px
examples of both faint and vivid stamp images
images should be slightly different from one another
all example stamps must be perfectly formed
examples of the stamp at different angles
Hint
Use multiple stamp samples to improve recognition.
To configure stamp recognition:
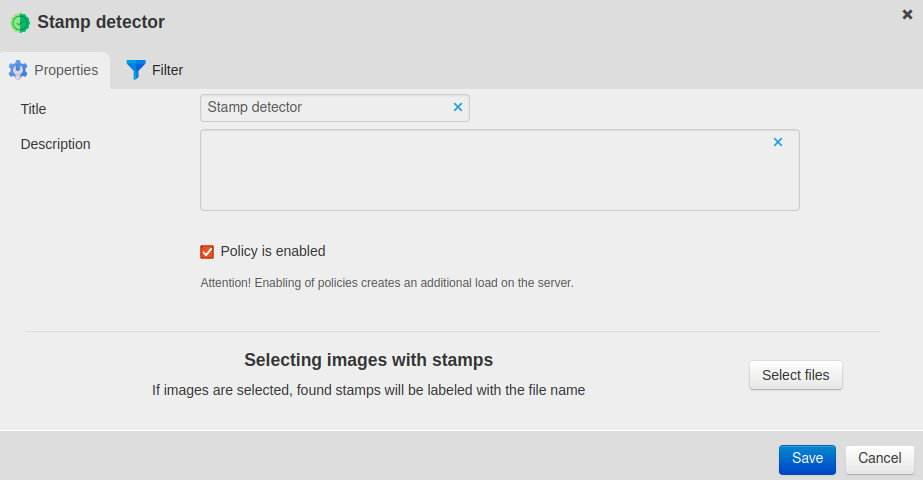
In the Policies → Content analytics folder, open the Stamp detector policy.
In the policy properties window, check the Policy is active option.
In the Selecting images with stamps section, use the Select files button to upload a stamp sample.
Wait until a check mark appears in the Status column next to the recognized stamps.
Set a policy filter. For example:
Content type — pdf, jpg, png
Event type — Intercepted file or Screenshot
Note
Filters need to be selected for the policy to work.
Select Save.
The results will be visible in the Triggered policies section.
Add additional stamp samples:
Select + New → Stamp detector. The policy creation window will open.
Check the Policy is active option.
Select Save.
Open the new Stamp detector policy in the Policies tab.
In the Selecting images with stamps section, use the Select files button to upload stamp samples.
Wait until a check mark appears in the Status column next to the recognized stamps.
Set a policy filter.
Select Save.
Stamp Recognition Accuracy
If there are several similar stamp samples, false positives can occur.
If a company or organization has similar stamps with different department names or division codes, false positive errors may occur more often. In this case, please contact technical support.
To reduce the number of false positives:
Open the Staffcop server configuration file:
sudo nano /usr/share/staffcop/settings.py
Reduce the parameter value STAMP_RECOGNITION_THRESHOLD.
Save the file and restart Staffcop:
sudo service staffcop restart
Face Detector
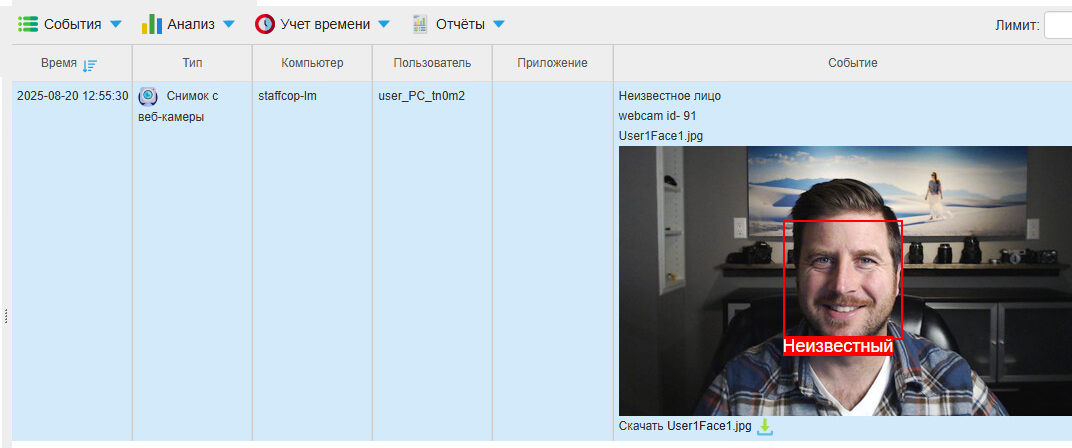
The recognition server can recognize faces in webcam images.
The recognition result is recorded in the following alerts:
No Face — no faces detected
My Face — the PC owner’s face was detected
Unknown Face — an unknown face not in the database was detected
Multiple Faces — the image contains multiple faces
No Image — the image is unreadable: too dark, blurry, etc.
My Face and Unknown Face check faces against images previously uploaded to the system.
To enable facial recognition:
In /usr/share/staffcop/settings.py add the following line:
FACES_TYPES = ( "WebcamSnapshot")See also
Recognition of images other than webcam images is also available.
Save the file and restart Staffcop:
sudo service staffcop restart
In the Policies → Content analytics folder, select the Face detector policy.
In the policy Properties tab, flag the Policy is enabled option.
In the Filter tab, select Event type then select the Webcam snapshot.
Select + File, then select Content Type.
Check the image/jpg and image/png options.
Select Save.
Once the first recognition results are received, assign each user an image:
Go to Constructor → Alerts and select Unknown face.
Find a photo with suitable lighting and a frontal angle (facing the camera).
Select the red box labeled Unknown.

If the face matches the user, select Yes to the question “Does this face belong to TestUser?”
Note
Selecting No will reset the match. Use the Close button if you do not want to reset the match.
Changes in face matching will only apply to new events. Make sure that the faces in the images correspond to the correct owners.
False Positives
False positives or a complete lack of recognition can be caused by taking photos at an angle, the head being tilted away from the camera, or part of the face being obscured.
To reduce the number of false positives:
Open the /usr/share/staffcop/settings.py file.
Reduce the parameter value FACE_DETECT_THRESHOLD.
FACE_DETECT_THRESHOLD = 0.5Note
If necessary, the value can be reduced further to 0.4, but the lower the value, the less detections are made.
Save the file and restart Staffcop:
sudo service staffcop restart
Facial Recognition in Screenshots and Intercepted Files
To recognize faces not only in webcam images, but also in screenshots and intercepted files:
Open the file /usr/share/staffcop/settings.py and add the following line:
FACES_TYPES = ( "WebcamSnapshot", "Screenshot", "InterceptedFile")
Restart Staffcop:
sudo service staffcop restart
In the Policies → Content analytics folder, open the Face detector policy settings.
In the properties window, go to Filters and add the following event types:
Webcam snapshot
Screenshot
Intercepted file
Select Save.
Important to Note:
The system can detect attempts to “mask” the camera, such as taping over it, blurring, etc.
Unclear photos may generate No image alerts. If this becomes an issue, please contact technical support.
The face must occupy at least 2.5% of the frame.
Ensure face sizes in an image differ by no more than two times to avoid false alerts from background faces.
Faces must not overlap. If there are two faces, the center of the smaller face must not fall within the outline of the larger face, or the smaller face will not be recognized.
Every recognized face is counted only once per photo. Redundant triggers are ignored.
HOG (Histogram of Oriented Gradients) is the recognition algorithm used.
Logs and Debugging
Recognition Server
The recognition server log is located at:
/var/log/staffcop-cpservice.log
Example:
2020-09-10 12:19:39,065 [DEBUG] cp_server:112 Request for 2020_09_10/ae4cd000abaecdaf46eec3d3ac90750d327e688a.jpe : text_extraction face_detection
where text_extraction and face_detection are optional parameters.
Processing result:
2020-09-10 12:24:20,125 [DEBUG] cp_server:127 Response for 2020_09_10/9ade404783b02bff8741ed1632ffbf63d883c64e.jpe done in 0:01:04.814513: "document_class": undetected, "face": {'size': {'width': 640, 'height': 480}, 'bounds': [{'top': 306, 'right': 381, 'bottom': 476, 'left': 211}], 'vectors': '...'}, "extracted_text": "
The command specifies the document type, extracted face and text samples, and processing time.
Staffcop Server
Recognition server log location:
/var/log/staffcop/content_processing.log
Errors
The following error indicates that there is insufficient space on the RAM disk:
[ERROR] content_processing:420 API error: [Errno28] No space left on device
This error occurs when working with large files or when the server has a large number of cores.
Increase disk space to resolve it.
To increase disk space:
Connect to the recognition server and open the /etc/staffcop/cpservice-config file.
Add the line:
RAMDISK_SIZE = '5G'
Save the file and restart the service with the command:
service staffcop-cpservice restart
Note
The optimal RAMDISK_SIZE is calculated using the formula: maximum file size to be processed x number of server cores. The default value is 500 MB.
Last Updated: 26.12.25