Recognition Server Installation
See also
Recognition Server Preparation
Prepare a separate computer for the recognition server.
Install additional packages:
sudo apt update && sudo apt upgrade
sudo apt install software-properties-common

# Install python3.7
sudo add-apt-repository ppa:deadsnakes/ppa
sudo apt install python3.7
sudo apt install python3.7-venv

# Install additional packages
sudo apt install -y libpoppler-cpp0v5 poppler-utils libsm6 tesseract-ocr ffmpeg
Add the Staffcop repository to the list of system repositories:
wget -O - http://distr.staffcop.su/stable5.8/staffcop.gpg | sudo apt-key add -
echo "deb http://distr.staffcop.su/stable5.8 stable5.8 non-free" | sudo tee /etc/apt/sources.list.d/staffcop.list
sudo apt update
Attention
The total package size is approximately 1800 MB. Downloading may take a long time if you have a slow internet connection.
Install the recognition server package:
sudo apt install staffcop-cpservice
Setting up the Staffcop Enterprise Server
Before configuring the Content analytics module, enable access to the Staffcop Enterprise server API:
In the web interface open Control panel → Server settings:
Turn on API access is enabled.
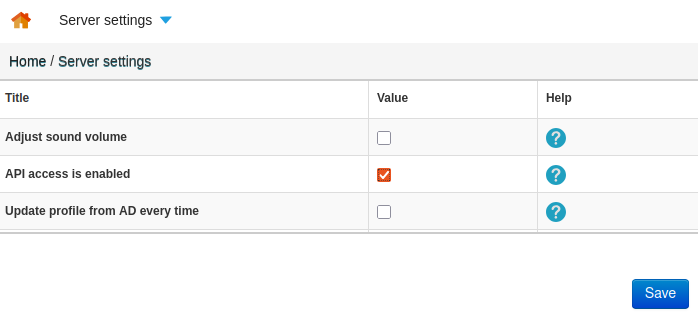
Select Save.
Set up the connection to the Recognition server:
In the Policy tab, open Policies → System policies → Recognition server.
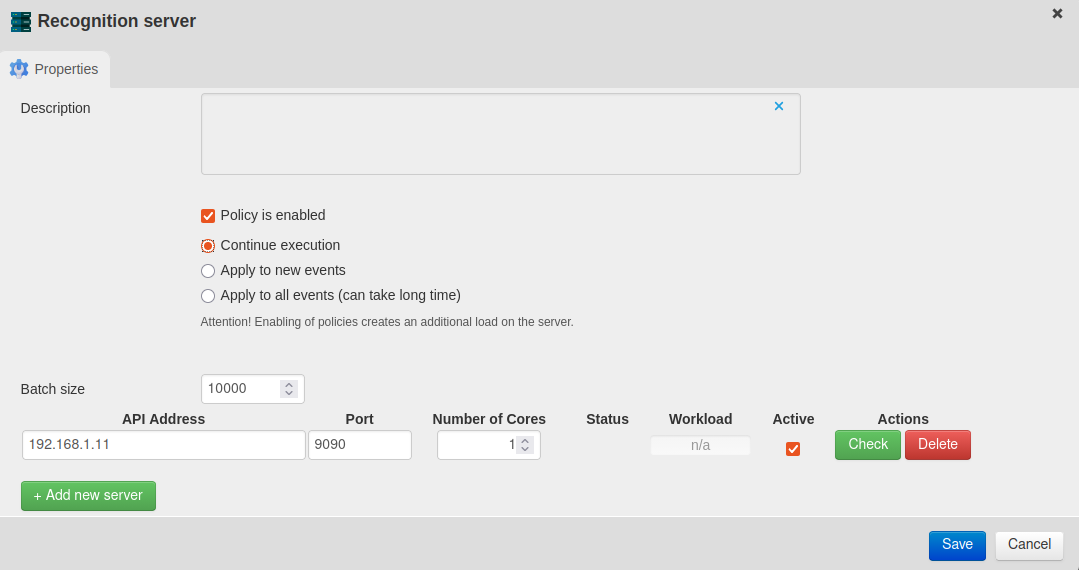
Fill in the recognition server information:
Batch size — defines how many events are sent to the recognition server in a single batch. A lower number results in more frequent updates but smaller batches. The optimal and default value is 10,000. Do not set the value to less than 10,000 to avoid increasing the server load.
API Address — domain name or IP address of the recognition server
Port — recognition server access port
Default port: 9090.
Number of Cores — needs to match the number of cores in the module server
Status — server connection status
Workload — recognition server load
Active — turns recognition server on/off
Select Policy is enabled.
Select Save.
Recognition Server Configuration
Connect to the recognition server via SSH.
Open the recognition server configuration file in a text editor:
sudo nano /etc/staffcop/cpservice-config
Set the parameters:
PORT — server access port; default port: 9090
SERVER_ADDR — StaffCop Enterprise server address
SECRET — API key value, which can be found in Control Panel → Server Settings
Example:
PORT = 9090
SERVER_ADDR = 'http://192.168.1.x'
SECRET = 'xxxxxxxxxxxxxxxx'
Save all changes.
Restart the service:
sudo service staffcop-cpservice restart
The recognition server is configured. You can now configure the content analytics policies.
Last Updated: 25.05.26