macOS Agent Features
Overview
Feature |
Description |
Customization |
Allows you to change the build name and icon with support assistance |
Installation |
Simplifies installation and updates:
|
User Monitoring |
Enables authentication monitoring:
|
Application Control |
Controls and blocks application launches based on black-and-white lists |
Activity Monitoring |
Monitors user activity:
|
Screenshots |
Captures screenshots:
|
Keyboard & Clipboard |
Intercepts information:
|
Internet |
Tracks network activity:
|
Mail & Messengers |
Monitors messages and downloads based on:
Intercepts messages from:
|
Files |
Tracks file activity:
Controls files:
|
Devices |
Monitors removable storage devices:
|
Printers |
Capture printing for the standard macOS printing system (CUPS):
|
Remote Control |
Blocks the computer upon administrator request |
File Scanner |
Scans files in home directories based on content type:
|
Backup Server |
Lets you set up backup servers to guarantee continuous operation |
Intercepting Browser File Downloads
Starting with version 5.3, macOS agents can intercept files downloaded through browsers.
To enable file interception:
In the Control Panel → Computer Configurations, select your configuration.
In the Files section, enable File Activity and set File Size for Shadow Copying.
In Internet section, enable Browser History .
Done!
After activation:
If the browser was installed before the agent, a reboot is required to start intercepting downloads.
If the browser was installed after the agent, the agent will create shadow copies of all files from the browser download history.
Note
The agent only intercepts files recorded in the browser’s download history. Files downloaded through other methods won’t be shadow-copied.
Website Activity Tracking
The agent allows you to track website visits and search queries.
Website Visits
With version 5.5 and later, the agent can track website visits and search queries by monitoring network connections.
To enable website visit monitoring:
In the Control Panel, go to Computer Configurations and select your configuration.
In the sidebar, select Internet and enable Web Traffic.
Once activated, the agent will log Website Visit events, including:
username,
activity time,
browser name,
website address, including URL, domain, and full domain.
To view website visits in the activity report:
In the Builder, select Event Type → Activity Time.
In the top-left panel, set the time period.
On the right, click Report → Detailed Activity Report.
The Event Lens will display a detailed list of Website Visit events.
Tracking Search Queries
Search queries are recorded through browser history.
The agent tracks user activity across the following browsers:
Safari,
Google Chrome,
Yandex Browser,
Mozilla Firefox,
Opera,
Vivaldi.
To enable search queries tracking:
In the Control Panel, go to Computer Configurations and select your configuration.
In the sidebar, select the Activity Tracking section and enable Application Activity to track application activity.
In the Internet section, enable Browser History to capture website addresses.
Generate a Search Query Report:
In Constructor, select Event Type → Activity Time.
Set your desired time period in the top-left panel.
On the right, click Report → Detailed Activity Report.
The Event Lens will display a detailed report of Activity Time events, including website visits.
Each Activity Time event contains:
username,
activity time,
browser name,
website address, including URL, Domain, and Full domain.
Email and Messenger Monitoring
You can track email and messenger activity using screenshots, keylogging, and activity tracking. These features give you a full view of user interactions and help you spot any suspicious behavior.
How to Enable Monitoring:
Go to Control Panel → Computer Configurations and select your configuration.
In the sidebar, select Screenshots.
Next, select Keyboard and Clipboard in the sidebar.
Finally, select Activity Tracking from the sidebar.
Once everything is set up, you’ll see the relevant events in the Event Lens.
Analyze the events:
Activity Time — Review how much time was spent in email or messaging apps, and check for other events that happened simultaneously. Screenshots — View screenshots to see to monitor app activity, open windows, and spot unusual behavior. Keylogger — Look through keylogger records to capture everything typed by the user, focusing on messages in email clients and messaging platforms.This way, you can track unauthorized actions in email applications and messaging platforms.
With these tools, you can effectively monitor and track any unauthorized actions within email and messaging apps.
Computer Locking
Introduced in version 5.4.
This feature allows you to lock a user’s session. Once locked, any login attempts will be automatically rejected.
How to Lock a Computer:
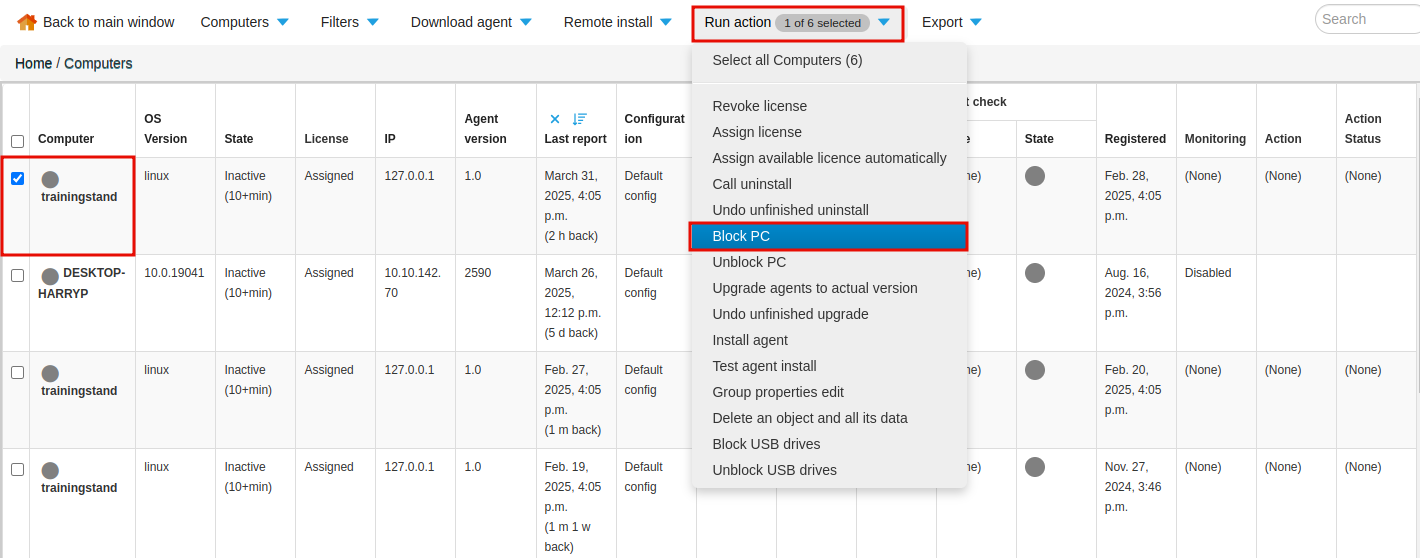
Go to Control Panel → Computers.
Check the box next to the computer you want to lock.
In the Perform Action tab, select the Lock PC option.
Done!
After the lock is activated, the user will be logged out, and the login window will appear on the computer screen.
How to Unlock a Computer:
In Control Panel → Computers, check the box next to the locked computer.
Go to the Perform Actions tab.
Click Unlock PC.
Controlling USB Devices
Starting from version 5.4, Staffcop allows you manage and control USB device usage.
When the feature is enabled, the agent tracks events related to USB devices:
External Drives — When a USB device is connected or disconnected
File Operations — When files are copied, modified, deleted, or otherwise manipulated on USB devices
Intercepted File — When files are copied to a USB device
Note
To enable shadow copying of intercepted files, activate :ref:Shadow Copying <file> in Computer Configuration → Files.
How to Enable USB Control:
Go to Admin → Computer Configurations.
Select Devices.
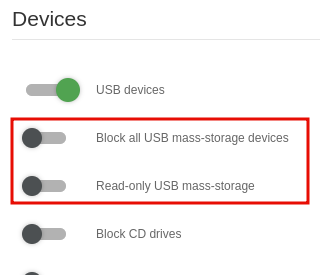
Toggle the USB Devices switch to enable control.
To block all USB devices or allow read-only access, enable the corresponding switches:

USB storage device access control can be further customized using :doc:black and white lists <../../../cases/USB_control>.
Note
Black and white lists block only USB storage devices.
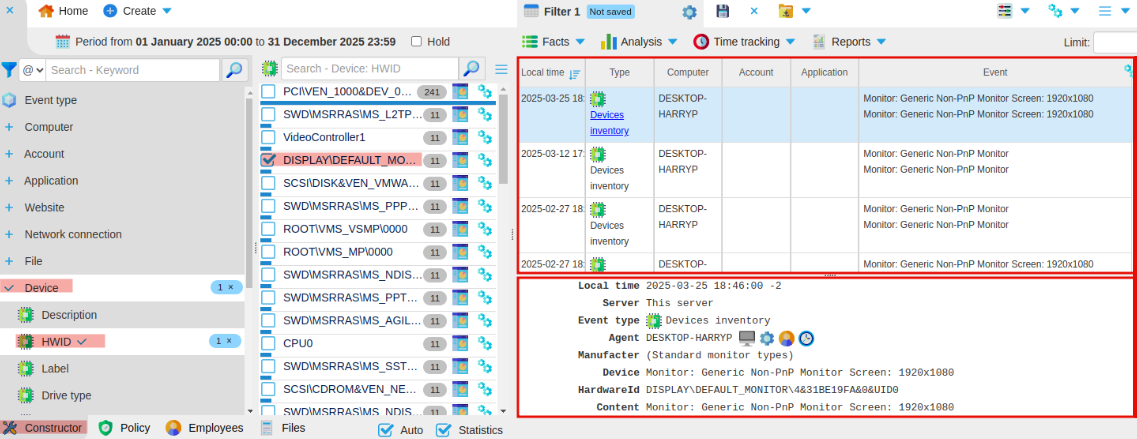
To view events related to a device:
In Constructor, select the Device dimension.
Select HWID.
Select the device to display events.

Document Interception during Printing
Starting with version 5.5, the agent can capture documents sent to the printer.
Note
This feature only works with CUPS (Common Unix Printing System), the default printing system for macOS.
How to enable document interception:
Go to Admin → Computer Configurations.
In the sidebar, click Files and turn on Shadow Copying.
Next, select Printers and enable Print to Printer.
Once these options are enabled, the agent will create two events when a print job is intercepted:
Intercepted File – This event includes:
print job details
a shadow copy of the document
a copy of the file containing printed content
a screenshot at the moment of printing
Document Printing – This event captures:
agent
user
application
file
number of pages
content


